Secure & Ad-free Internet Anywhere With Streisand and Pi Hole
9 minute read
tl;dr:
- ads are everywhere and aren’t so fun
- everyone is trying to track you (for better or worse)
- Pi Hole is awesome; it’s a network-level adblocker and runs on a Raspberry Pi
- streisand gives you a quick way to set up a censorship-resistant and secure server running a number of VPNs/proxies (OpenVPN, Shadowsocks, Wireguard, and more!)
- you can combine them to get a secure & resilient connection with network-level ad-blocking everywhere you go (iOS/android, linux, mac OS, windows, etc.)
Pi Hole is a suite of tools designed to do network-level ad blocking by acting as a localized DNS resolver.
I recently took some time off of work to spend time with family. During some free-time I had, I worked on a few side projects like getting our backups in order and getting a Raspberry Pi 3 running Pi Hole. I’m always a fan of better security at every level for people and their data, so these were really fun to get set up. With the Pi Hole running at home and our data being securely backed up, I felt we’d made a couple important leaps forward in terms of data privacy and security. But I wanted that same privacy and ad-blocking capability wherever I was (on my phone, using my laptop remotely, etc.). I’d seen documentation about setting up a VPN on a remote server and using Pi Hole, but the examples were generally unwieldy and assumed too much of the reader (knowing a lot about X VPN system etc.). So that’s where this post comes in.
In this post, I’ll walk you through another weekend project that I recently worked on in the same privacy and home-tech vein: setting up a private VPN server on AWS with streisand and adding pi hole to get secure connectivity with network-level ad-blocking anywhere you go and on all your devices. Sounds good right? Read on to find out how.
Pi hole?
![]()
- Network-wide protection: Instead of browser plugins or other software on each computer, install Pi-hole in one place and your entire network is protected.
- Block in-app advertisements: Network-level blocking allows you to block ads in non-traditional places such as mobile apps and smart TVs, regardless of hardware or OS.
- Improve network performance: Since advertisements are blocked before they are downloaded, network performance is improved and will feel faster.
- Monitor statistics: Our Web interface offers control of your Pi-hole and a central place to view statistics. We also include an API for extending these stats.
Like I said, I got one of these set up during some time off in November. And having the Raspberry Pi has been great. For one, it’s easy for my family to use since there’s essentially nothing to be done to use it. And it’s a network-wide adblocker, so our our non-browser devices are moderated, too! We’ve seen speed-ups on many devices and gotten some insight into which devices are calling home decently often, too. I even started noticing some network calls our ISP appears to be making, something I’m still looking into.
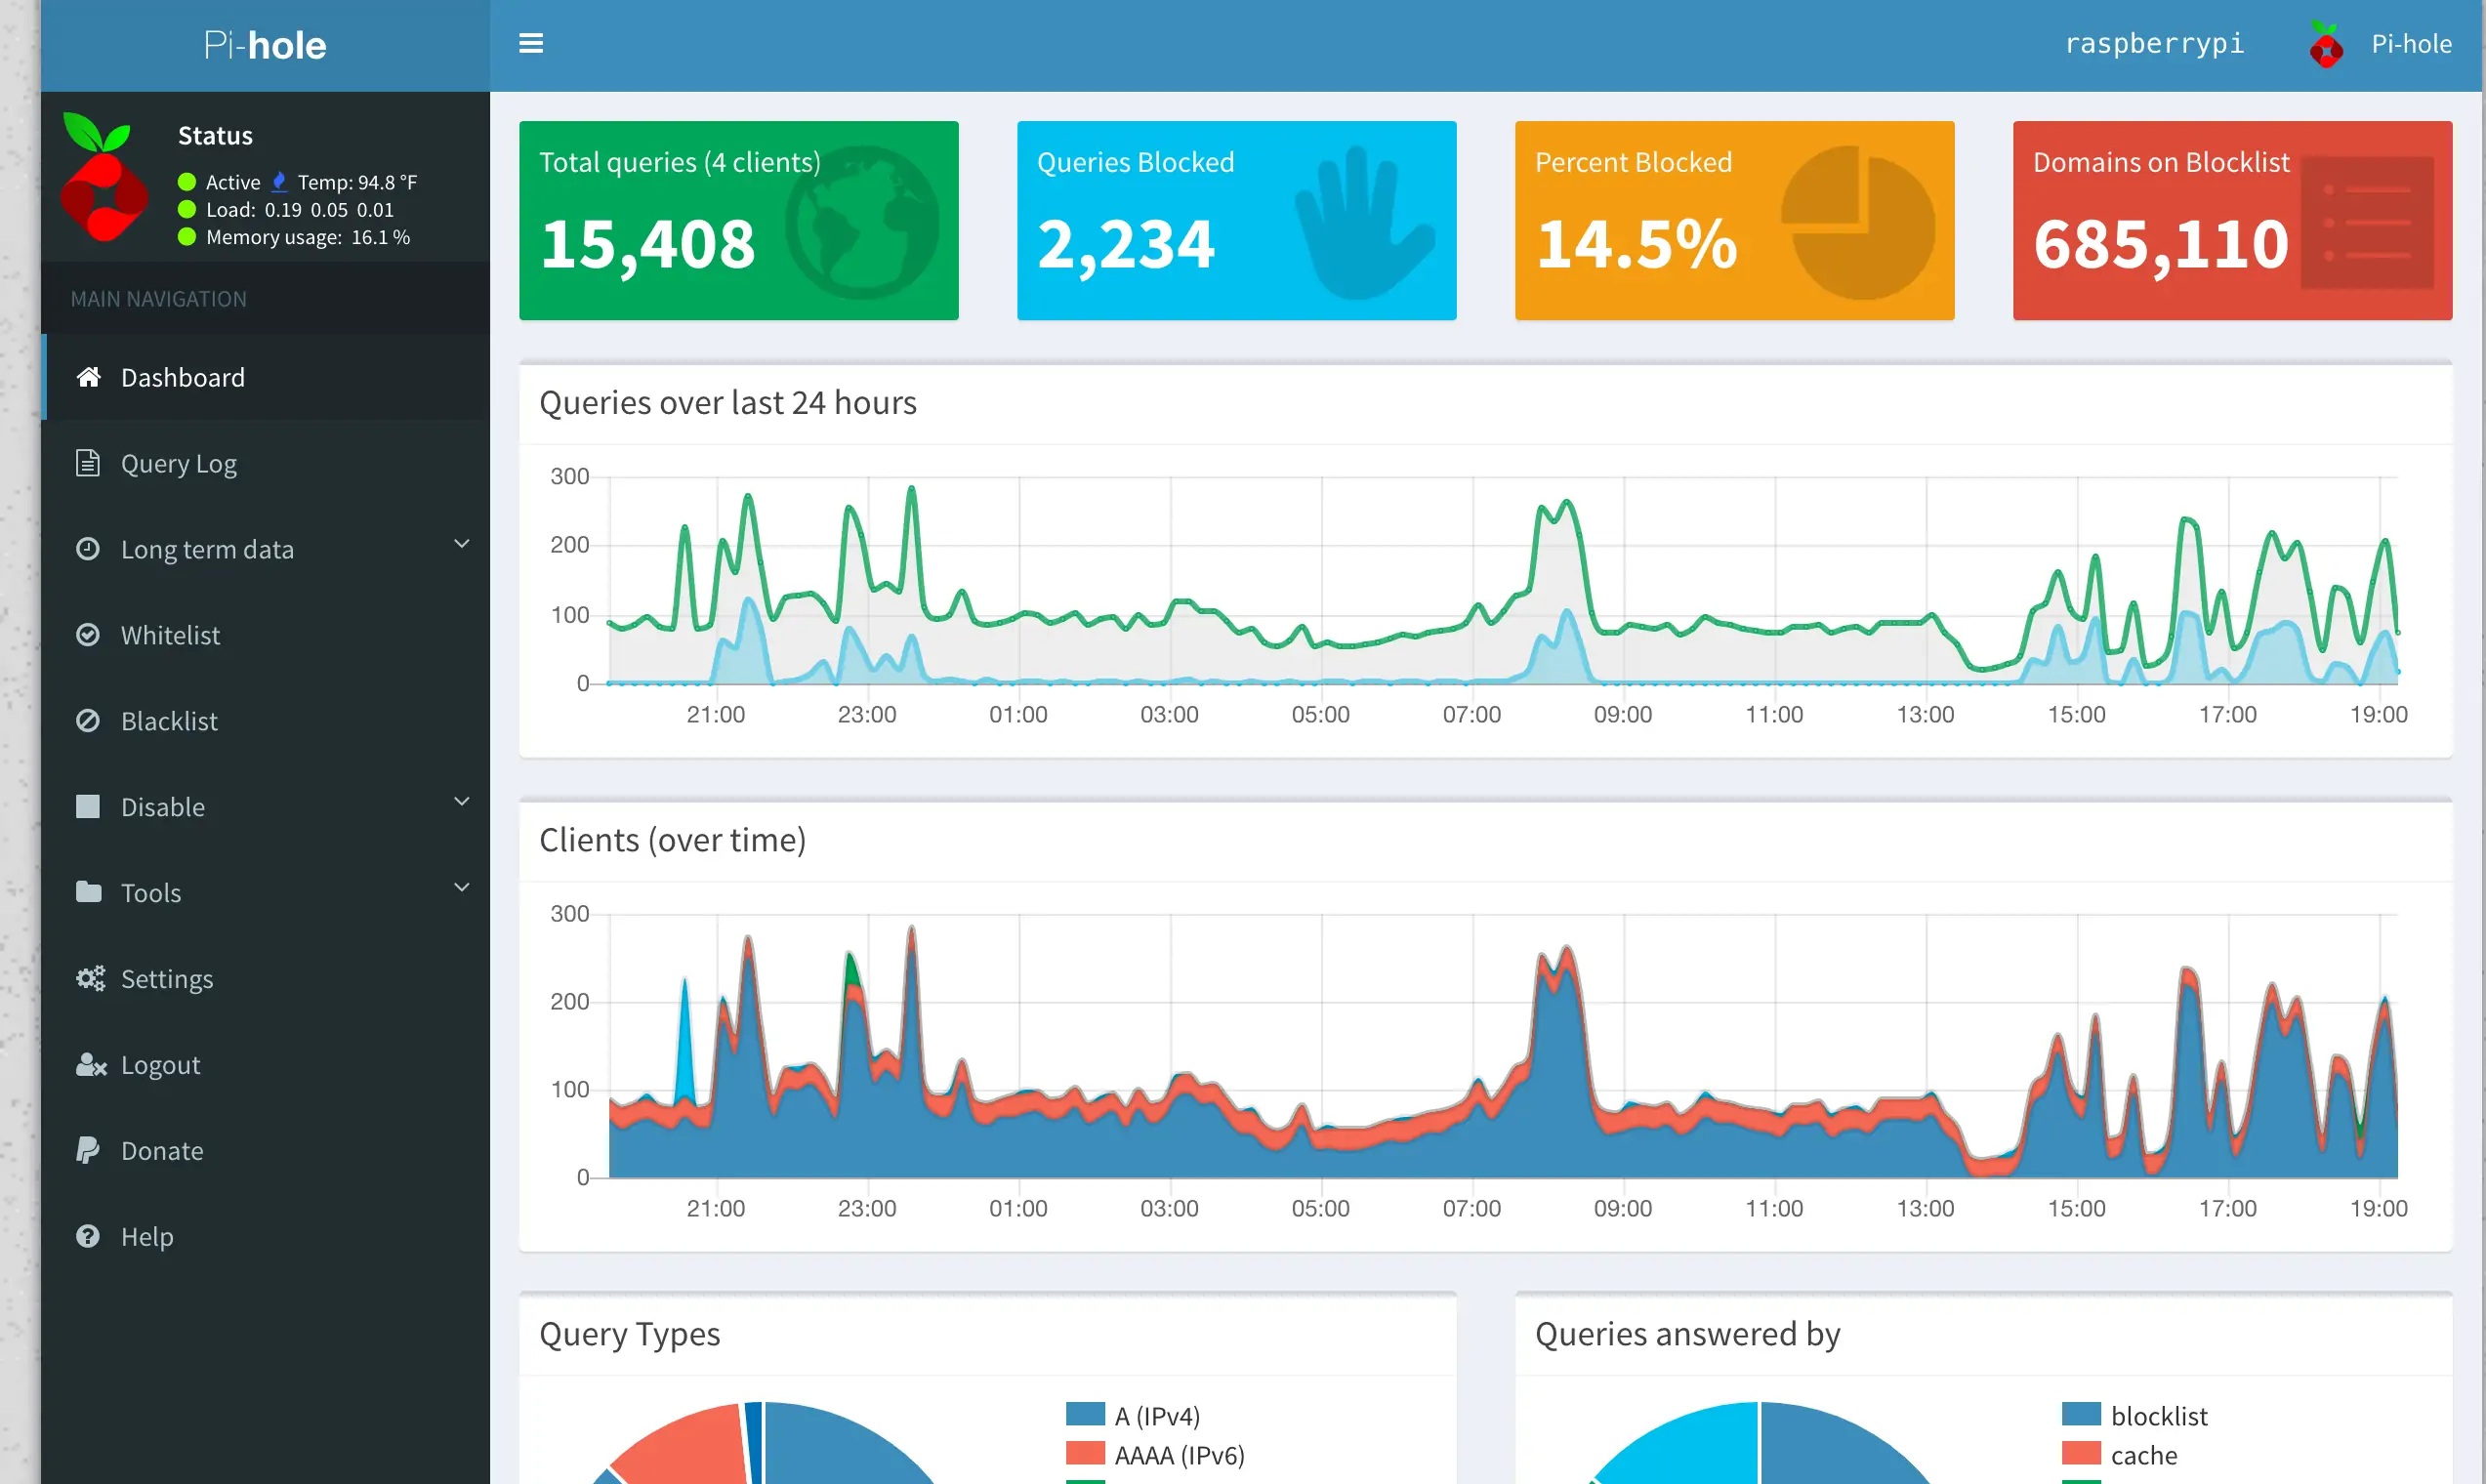
I won’t do a full walk-through on getting the pi hole set up on a raspberry pi since I think that deserves it’s own treatment. But I do want to show off some of what the Pi Hole brings. Check out this dashboard with some sample data from the other day.
Our Pi Hole dashboard. The 14% was even decently low; most days when I check it’s usually around 20%. Which means at least roughly 1 in 5 network requests is aimed at either ads or some sort of tracking. It’s telling to see which apps and even other devices around our home are calling home often or out to ad services. Not surprising, really, but it’s another thing to see it happening in your own home.
Setting up a Wiregured, etc. Server with Streisand
I’d looked into projects like OpenVPN in the past, but what always held me up was 1) a not-hard but also not-easy setup process and 2) feeling juuuust lazy enough and/or motivated by other things to not want to go through the trouble of setting it up. I have a VPN through work, so it wasn’t something I wasn’t used to or understood the benefits of.
But once I learned you could easily combine the pi hole’s ad-blocking capabilities with a VPN, I wanted to make it happen ASAP. This fact, plus discovering the streisand project were a perfect recipe for a (next available) weekend project. Streisand is great because it’s designed for speed and ease of use but also aims to be censorship resistant so it implements best practices. It also offers a wide variety of technologies out of the box, so you can choose a setup that works for you (ranging from more compatible to more performant).
Clone the streisand repo to start and run it’s python venv setup.
git clone https://github.com/StreisandEffect/streisand.git && cd streisand
./util/venv-dependencies.sh ./venv
source ./venv/bin/activate
You can choose a wide variety of platforms to run a streisand server on. I use AWS heavily professionally and personally, so I went with that. I made a few tweaks to the playbooks since I wasn’t happy with some defaults on a first run. Will probably open a PR to see what the team behind the project thinks of a few small changes.
playbooks/roles/genesis-amazon/defaults/main.yml
You can just as easily do this in the EC2 console later, too, if you prefer. I wanted to change to a T3 since that generation of AWS server is generally more cost-effective for the resources it gives you. To keep costs down, I ended up purchasing a reserved instance for the year and that cut my aws costs almost in half (notable, too, when you can run your own VPN instead of paying the likes of Nord VPN or one of the others).
If you do find yourself here and unfamiliar with or unwilling to use AWS or another system to run your own server, pleast consider Proton VPN as a secure alternative that isn’t as likely as the other providers to skim your data.
#...
aws_instance_type: "t3.micro" # or whatever instance type you want
#...
playbooks/roles/validation/tasks/main.yml
When I first ran through setting up streisand, I set the maximum number of client profiles (20) but later found this likely wouldn’t be enough since I’m trying to get my family and extended family to use the VPN and have better data security and privacy. If I can get them all to use this setup and 1Password I will be happy. Yes I am a ton of fun at parties and family gatherings ;) If 20 is sufficient for you, no reason to make this change.
NOTE: adding more profiles will slow down the setup process, especially if you’ve enabled all the options. I think setting up 150 profiles took around an hour or so for me (another reason to opt for the T3 over the T2.micro).
#...
when: (vpn_clients > 150) or (vpn_clients < 1)
#...
Finally, run the ansible playbooks.
./streisand
Feel free to choose whatever setup works best for you. The streisand ansible playbook will walk you through all the steps. The only parts worth noting or where I deviated from the defaults are:
- I use Cloudflare for DNS, so I used the elastic IP to set a DNS record for the domain/subdomain we use. Streisand will prompt you for this FQDN during the process and try to get a Let’s Encrypt SSL cert for you. If you do use Cloudfare, make sure not to set the “DNS/HTTP proxy” setting at first. If you do, Cloudflare will see your application as being offline and resolve to a Cloudflare offline server. I discovered this after hitting my domain and then using
digto see what was actually being resolved. I turned the Cloudflare cache/proxy back online after the server was running. - I set up all the default options, but didn’t elect to set up a Tor server (for now). Feel free to choose whichever options you prefer
- I had the playbook create a ton of profiles, so it took a lot longer than 10 min (probably just over an hour).
Once the setup is complete, streisand will let you open up a local HTML file that has the instructions for connecting to your gateway.
Adding Pi Hole
To get the benefits of Pi Hole in your new VPN(s), ssh into your box. If you used the AWS setup, the EC2 console has a easy “connect” button that will show you how to do this. Once you’re in, you should run the pi hole installation script:
(in your instance)
If you’re interested in other installation methods, check out https://github.com/pi-hole/pi-hole/#one-step-automated-install
curl -sSL https://install.pi-hole.net | bash
For the pi hole options, I followed all the defaults, choosing tun0 as the interface to listen on and I also installed the web interface. Interestingly, since streisand’s gateway is fronted by nginx, I’ll need to find a way to allow access to the pi.hole UI admin. This is on my to-do list and shouldn’t be all that hard (likely just some nginx config). If you want to see stats sooner, you can run pihole -c from inside your instances and get some basic stats. If you want to update your blocklists, you can also do that from the CLI inside your server. I added a few from https://firebog.net and have had good success. Blocklists there are marked as more or less likely to cause issues while browsing. This is helpful since you can gauge how often you wan to intervene to resolve issues or false-positives.
There’s not much else to do to get up and running. For our setup, we use either TunnelBlick, Shadowsocks NG, or Wireguard clients for desktop and primarily Wireguard for our phones since it offers the best overall performance. There are also OpenVPN clients available for seemingly every platform. Once you’ve connected, check out https://pi-hole.net/pages-to-test-ad-blocking-performance/ to see the ad blocking goodness at work! You can also visit duckduckgo to see your IP (should be the elastic IP you set or similar).
Questions, thoughts? Let me know in the comments or @markthethomas